

In April, 2019 my climbing buddy, Glenn – K2FF forwarded me a note from one of our club members and long-time friend, Bill – K5YG. Bill has had a SteppIR 3E up since shortly after Hurricane Katrina in 2005. The antenna has performed flawlessly for these years until very recently when it started exhibiting high SWR on all bands. Rather than try to either re-work the antenna himself or send the Element Housing Units (EHUs) to SteppIR to be rebuilt Bill decided to purchase a T8 LPDA from Tennadyne and replace the 3E. So, Bill was looking for a crew to take down the 3E and replace it with his newly purchased T8, K2FF and W5UE to the rescue!!! That work was accomplished without incident early in April. Bill generously offered to donate the 3E to the 599 DX Association if I wanted to take it and try to get it functional again and use it for our club station, NA5NN. Upon removing the fiberglass element poles to transport to my QTH it started to become apparent that something was pretty messed up inside the EHUs. Copper element ribbons were sticking out random lengths from both the driven element and reflector and would not retract. We carefully secured the loose ribbons as best we could and I carried the whole thing to my QTH in Lumberton.
Phase 1 – EHU Rebuild
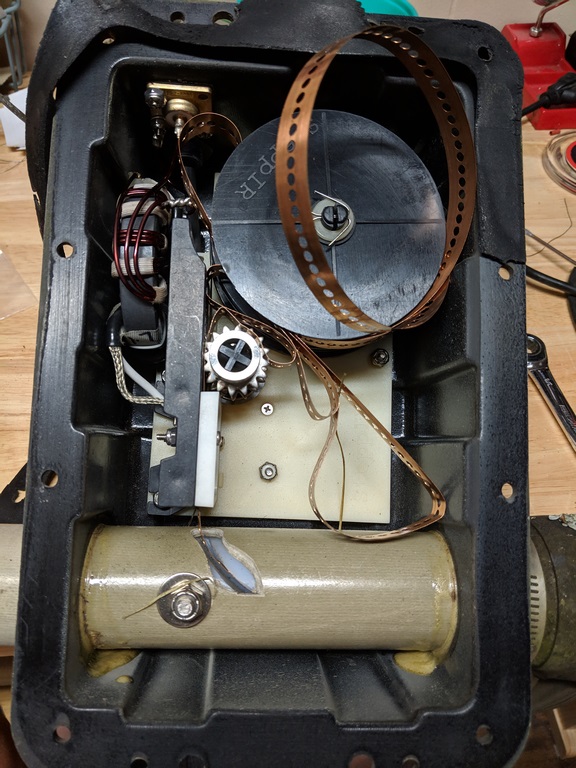
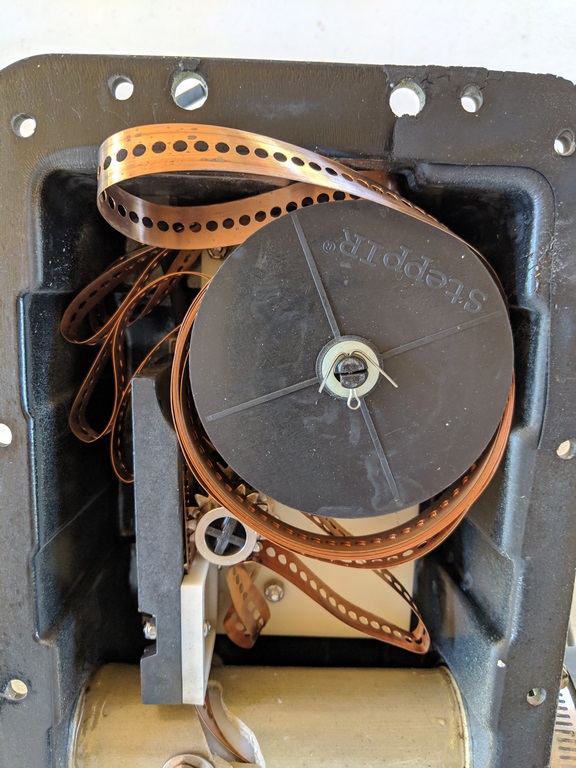
A few weekends later I got around to removing the EHUs from the boom and opening them up for a look-see… Photo on the left is what I found when I opened up the driven element EHU. Both ribbon spools were a tangled mess inside and the shaft that the spools ride on was broken at the base. Opening the reflector EHU (Right photo) I found a similar situation, maybe a little worse and the spool shaft was also broken at the base.
I moved on to the director EHU expecting to find the same thing since the motor test function was not properly moving the ribbons according the the controller manual. However, I discovered that the ribbons really were not tangled, just a little loose on the spools, however the spool shaft was broken loose from the base, just as in the other two.
My next step was to reach out to SteppIR support. I sent them a few photos and described what I was seeing. I received a response very quickly saying this was not an uncommon issue, especially in the older 3Es with old style EHUs. They of course offered to sell me a new set of EHUs but I told them I was interested in trying to repair them myself and asked for advice. The tech assisting me (Julio, W4HY) was quick to send a list of recommended replacement parts based on my photos and descriptions…. as to be expected, new reels with new copper ribbon for all, 3 new reel base plates with shafts, new gaskets for the EHUs and molded bullets for the ends of the copper ribbons. He also provided me with a pretty comprehensive step-by-step procedure for performing a ribbon replacement and I will be referring to it as I describe my rebuild. This document, along with a few YouTube videos from hams who had rebuilt their EHUs, were invaluable. So, I watched the videos and read the document a few times and decided that this was something I could try and tackle. Since the ribbons on the director EHU didn’t have any significant kinks and overall looked to be in pretty good shape I decided to save a few bucks and salvage those reels and ribbons. I went to SteppIR’s online parts ordering page and quickly built my order, 4 reels with ribbons, 3 base plates with shaft, 3 EHU gaskets and a handful of molded bullets. Parts total was in the neighborhood of $260, not too bad for a “like new” 3E if my rebuild succeeded. However, when I proceeded to the checkout phase and the order page added shipping it added a whopping $105 for what could easily fit into a medium USPS Priority Mail box for around $15 anywhere in the US. I sent another email to Julio explaining what happened. He referred me to Sales (Roee and Jeff, N7CID). Jeff replied back immediately apologizing and saying that the web site did not always do a very good job of calculating shipping and handling. He had Roee work up a revised invoice with shipping/handling where I was expecting it to be. Hats off to all of the SteppIR folks involved in quickly resolving this and also providing exceptional guidance on the rebuild process. So, with my order finally in I decided to take the next few evenings after work to tear-down the 3 EHUs and ready them for rebuilding.
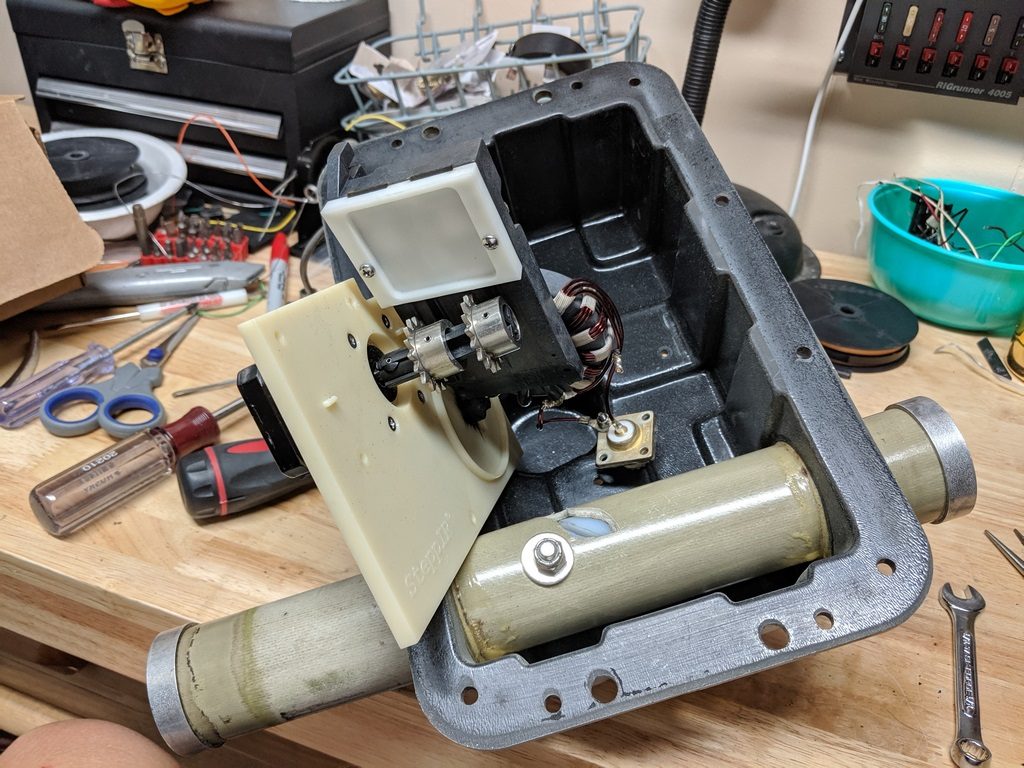
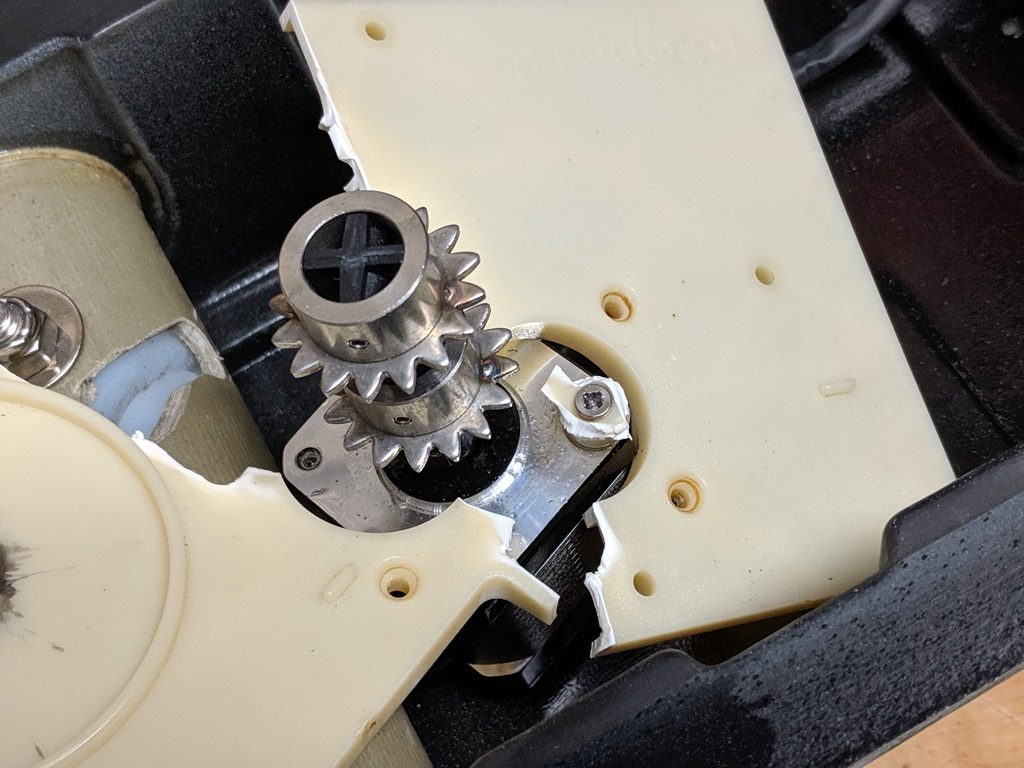
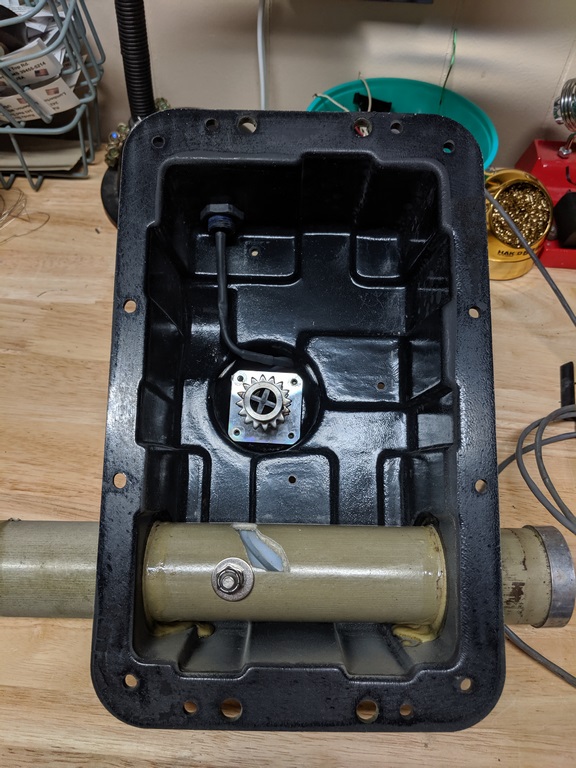
Within a week the new parts arrived and I was ready to begin rebuilding the EHUs. I followed the reel/ribbon removal process pretty much as it is described in the reel replacement document. In order to reach all of the screws holding the stepper motor from the mounting plate you need to first remove the screws holding the platen to the mounting plate so the platen assembly can be moved out of the way enough to expose the 4 screws holding the stepper motor to the mounting plate (See left photo). In my case the stepper motor wiring was hard wired so I didn’t have a lot of room to work with and had to use extra care not to put too much stress on them and break any of the wires. The middle photo shows my first challenge in the process, and one that was repeated on all 3 stepper motors. All 4 of the screws holding the motor to the mounting plate were difficult to remove without stripping the screw heads. I was using a good quality Phillips of the correct size and going SLOWLY. It was almost like the screws were glued or galled into the motor housing. On all 3 motors I managed to get 3 of the screws out but had 1 in each motor that I just ended up stripping the screw head to the point it wouldn’t turn any longer. After the first one I tried spraying the screws with PB Blaster in hopes of loosening them some. This helped, but was not a 100% solution. Once I was left with one screw that just wouldn’t come out I had to take my Dremel tool with plastic cutting wheel and do surgery on the mounting plates to the point that I could get a small pair of needle-nosed vice-grips on the screw head and slowly back out the screw (See the middle photo). The right photo shows a gutted EHU once that process was completed and ready to install the new mounting plates and reels/ribbons.
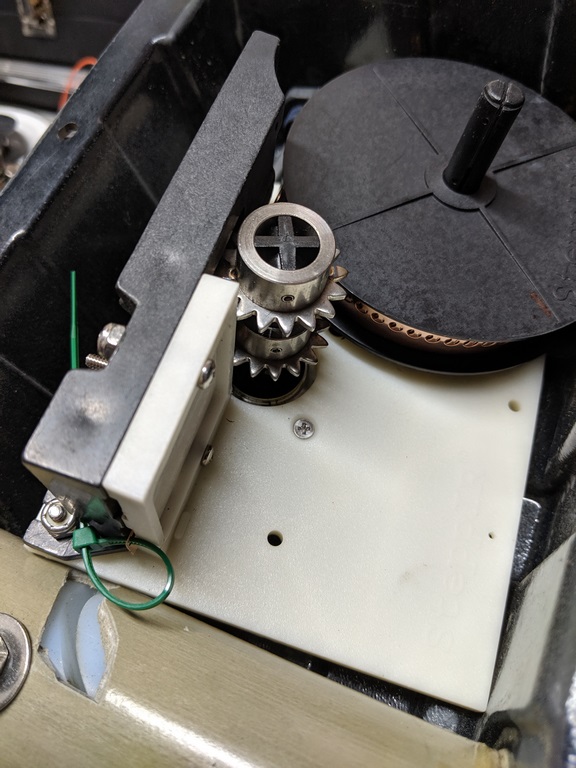
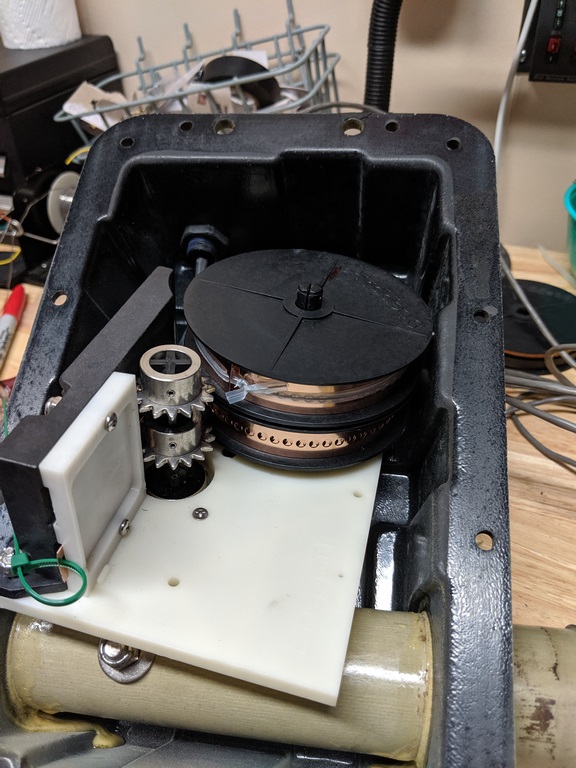
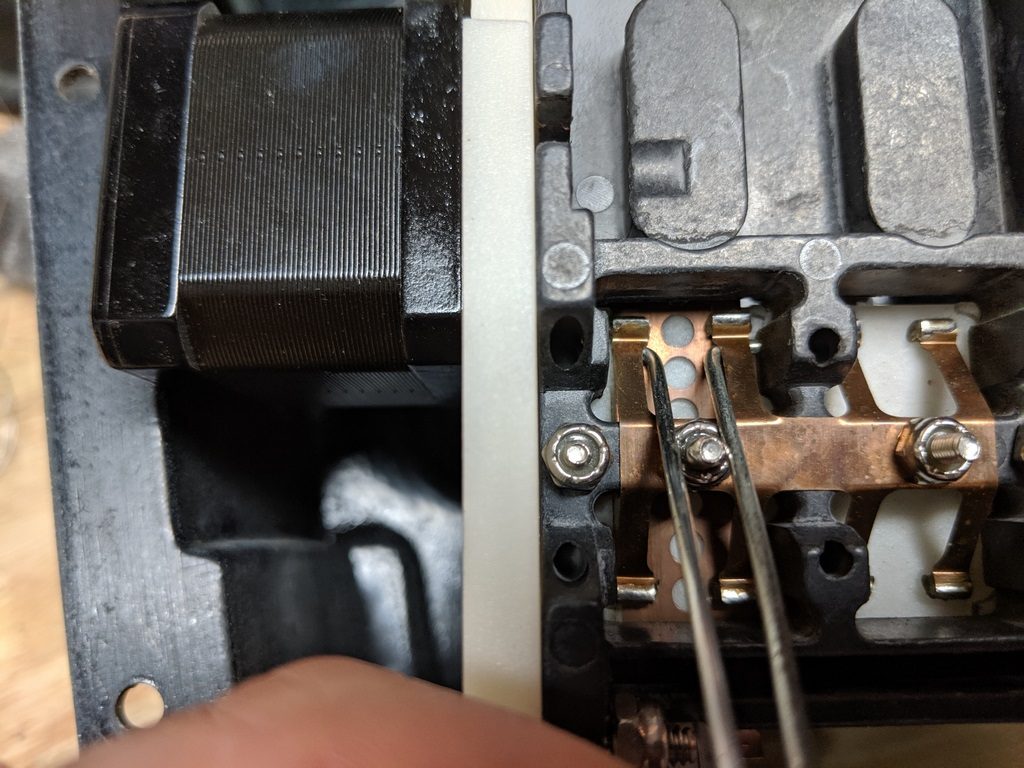
The two upper photos show my installation of the new reels in one of the EHUs. I’ll say up front that a second pair of hands from an assistant are a big help here. In the SteppIR document steps 7 and 8 in section 2.1 are tricky, basically having to back out the first ribbon to the spot just before feeding onto the sprockets to allow the second ribbon to feed evenly with the first one back onto the sprockets and under the brushes. I did this for the first EHU (not fun).. for the other two I decided to leave the platen cover in-place but remove the screw/nut holding the platen against the sprockets. This allows the platen to be moved away from the sprockets and you can slip the ribbons under the brushes individually. Now with the platen cover in place the ribbons reach the brushes and don’t just easily slide under them. The two lower photos above show a “tool” that I fabricated to assist. It’s one of those giant paper clips that I first straightened out, then bent into a narrow “U” shape. I then used needle-nosed pliers to bend each end as shown in the lower left photo. Slip the bent out ends under the brushes and lift slightly while feeding the ribbons under. Do one at a time getting the first completely under the brushes and out the end of the platen. Then use the tool to lift the other set of brushes and get the other ribbon under and lined up with the first. Then secure the ends with a ty-wrap or twist tie as described in the document. Once both are under the brushes and at the end of the platen and secured with a ty-wrap slide the platen back into place making sure the ribbons engage in the sprockets, then secure the platen to the mounting plate. It really helps if one person is feeding the ribbons while the other is lifting up the brushes and making sure the ribbons are feeding correctly. Again, I cannot stress enough, whether you decide to use my modified approach or not, READ THE STEPPIR DOCUMENT CAREFULLY… My modified approach above worked for me on 2 of the EHUs, but SteppIR’s approach worked for the first one. So if you aren’t comfortable with changing anything… DON’T… When you are done with this phase your EHU should look something like the image below. Note: The green wire holding the reels in place on the shaft was temporary, to be replaced with a cotter pin during final assembly.
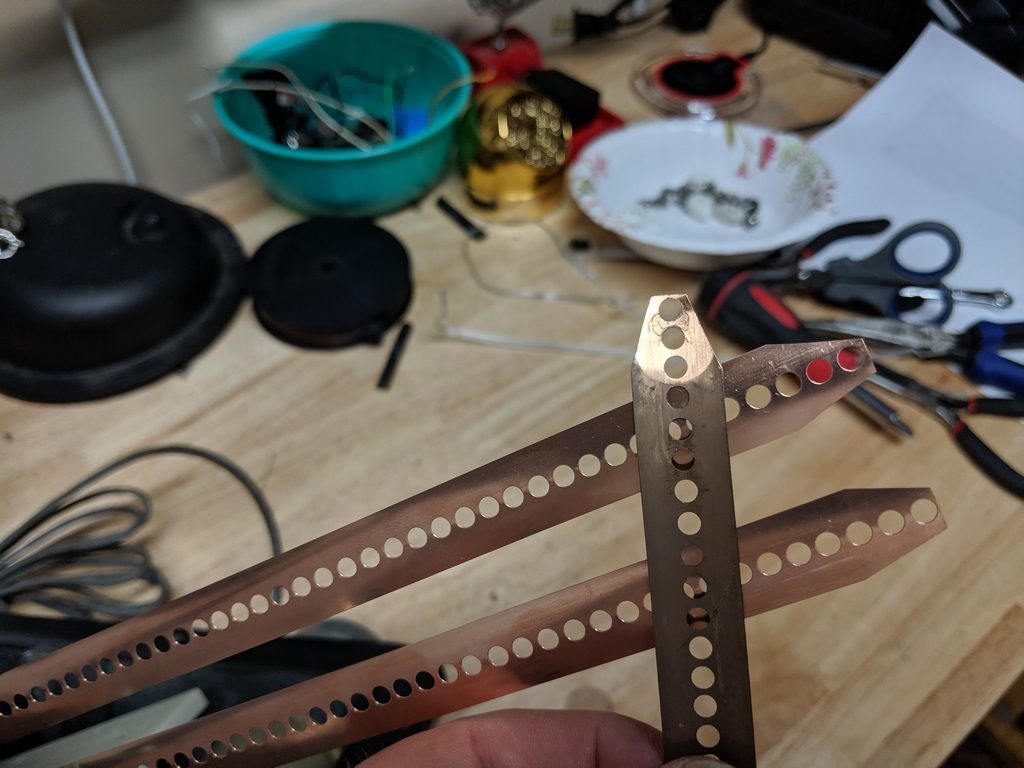

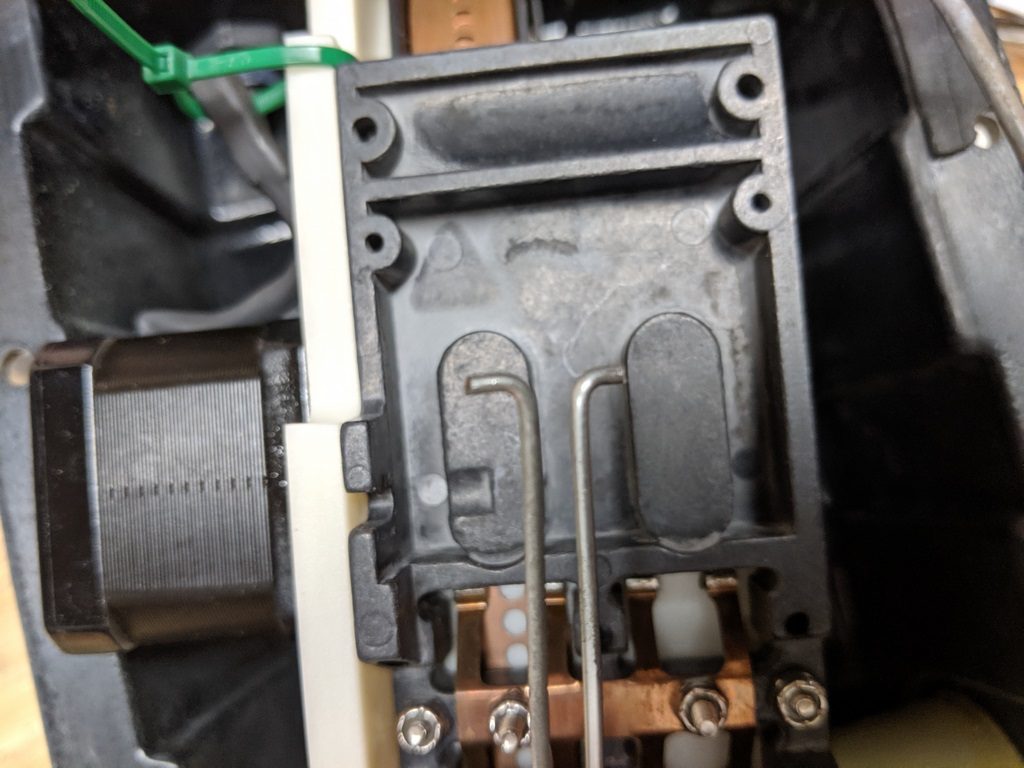
Picking up on Step 12 of the reel replacement document it’s pretty straight forward. Only deviation I did since I didn’t have a “copper cutting guide” was to make my own from one of the ends of a damaged ribbon I had removed (right photo above). I just laid this on top of each raw end and trimmed with a sharp pair of diagonal cutters. Once the ends are cut, I manually retracted the ribbons back to the end of the platen and secured. Then reattached the mounting plate back into the EHU casing. I then followed Steps 13-17 in the document to feed the ends of the ribbons into the ESTs and attach new molded bullets to the ends. Before closing up the EHUs I connected the control unit to each EHU on the bench and ran through the motor test procedure several times making sure the reels turned smoothly and ribbons moved in and out as expected. I actually did this several times over the course of a week to build some confidence in my work. However, at this point they hadn’t moved more than the few inches in and out that the motor test does.
Phase 2 – Fiberglass Element Rework

I don’t have any “before” photos of the fiberglass elements. Somehow I neglected to do that. But, suffice it to say they were in pretty rough shape with most of the original paint weathered and completely gone in some spots due to being exposed to the elements in south Mississippi for over 11 years. I found several good refurbishing how-tos on the Internet. Most notably a video by Max, NG7M and web page by Don, AA5AU. I followed their guidance first sanding the poles to smooth out any rough fiberglass and provide a good surface for paint adhesion. I took the recommendation of using Rust-Oleum Topside Marine Paint (Deep Green) and brushed on two coats with a good quality 1.5″ brush. I had removed all of the old tape over the element section joints. Once painted/cured I re-taped and covered each joint with adhesive, heat shrink tubing. If you are doing a similar re-work I strongly suggest looking at Max and Don’s sites. There are some good tips there. I do not fancy myself a painter, but they came out okay, I think.
Final Assembly/Testing – My “Duh” Moment!!!
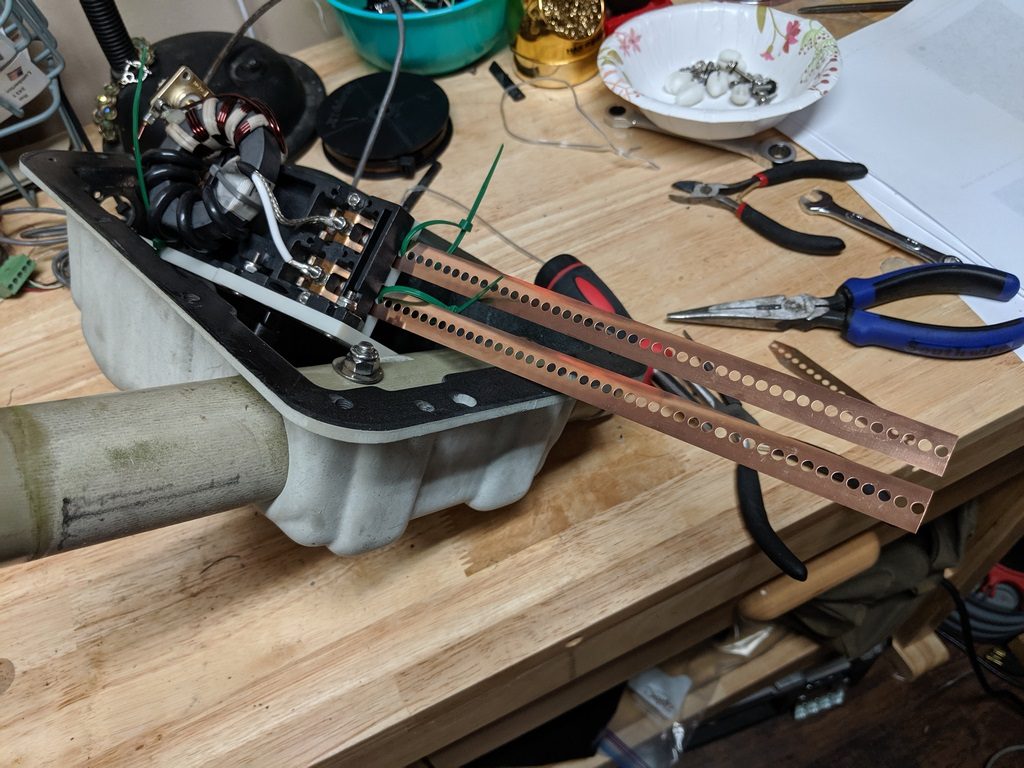
With the EHUs rebuilt and element poles repainted I reassembled the boom, attached the EHUs and taped up all the control cables to the stepper motors along the boom. Before putting the element poles back in place I really wanted to verify my EHU work and see the copper ribbons extend out more than a few inches from the ESTs and then retract as they are supposed to. However, I was very apprehensive about running the ribbon out on the ground and besides, SteppIR does not recommend it due to the possibility of kinking or tangling the ribbons. I talked myself into doing one test, attaching the controller and setting it in Ham Mode then selecting the 10M setting. My rational was that this was pretty short and with a few volunteers we could keep the ribbons from being damaged. This did go quite well and once I was satisfied that the lengths of each ribbon were about right for 10M I performed a Retract on the controller and the ribbons all went back to the safe, home position. Field Day weekend was coming up and K2FF and I had decided to do a 3E entry from my QTH. I decided this would be a good time to give the 3E a good workout as a second 20/15/10M yagi so when Glenn arrived Friday to assist with setup we assembled the fiberglass poles onto the EHUs and started testing. First set the controller to 10M and checked SWR… even sitting on saw horses not more than 2′ off the ground the SWR was under 2:1, 12M, same, 15M, same, 17M, pretty much the same… then selected 20M… as the ribbons were extending out we both heard a strange sound coming from the antenna… SWR check was way off… 5:1. I retracted the ribbons and ran the calibrate again from the controller, just to be sure… then ran through the same sequence… 10M, 12M, 15M, 17M all good… 20M, strange noise and high SWR again… At this point we decided to pull the fiberglass poles off, leaving the antenna extended to 20M. It didn’t take long to see that something was amiss. Pulling one of the reflector poles we found the ribbon kinked about a foot from the end… one of the driven element ribbons was similar, and the lengths were not consistent from one side of an element to the other…. It dawned on both of us about the same time… obviously there was some trash in some of the element poles, far enough out to only impact 20M. I felt like a real idiot!!! With all of the careful work I had put into the EHUs and refinishing the fiberglass poles I neglected to check for trash inside… The element ends had no visible signs of end protectors. Not sure if they just eroded over time or were never there to begin with. This allowed insects to enter and start building nests inside… It should have been one of the first things I checked for… So, we cleaned out all of the poles and made sure we could see daylight end to end… a small diameter piece of aluminum tubing from my aluminum stash did the trick… a blast of air from my compressor made sure everything was out… This done we reassembled the antenna and ran through all the bands, now ALL 5 bands looking good, and no more strange noises. Of course 20/20 hindsight says this was probably what started the EHU failures to start with. Repeatedly trying to extend/retract the ribbons when Bill wasn’t sure what was wrong.
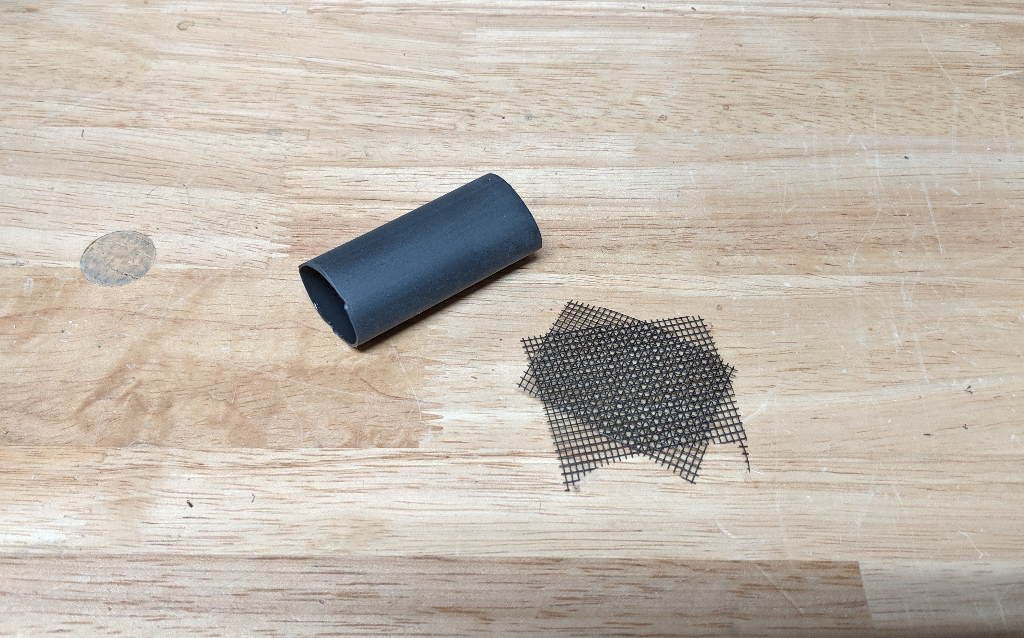
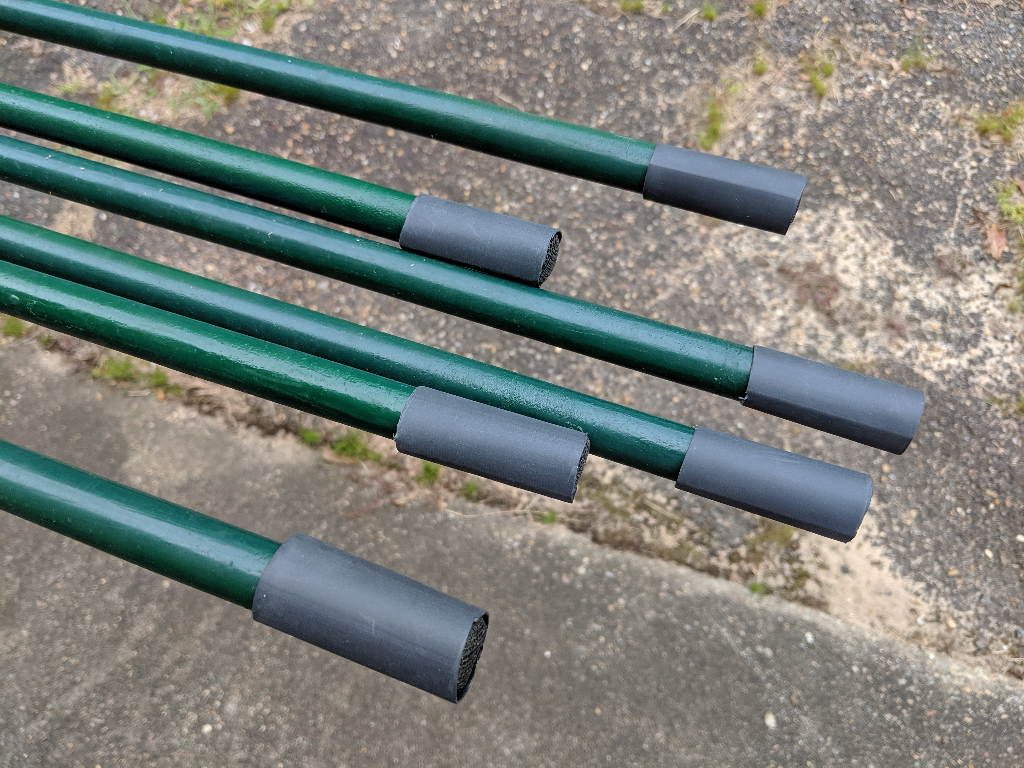
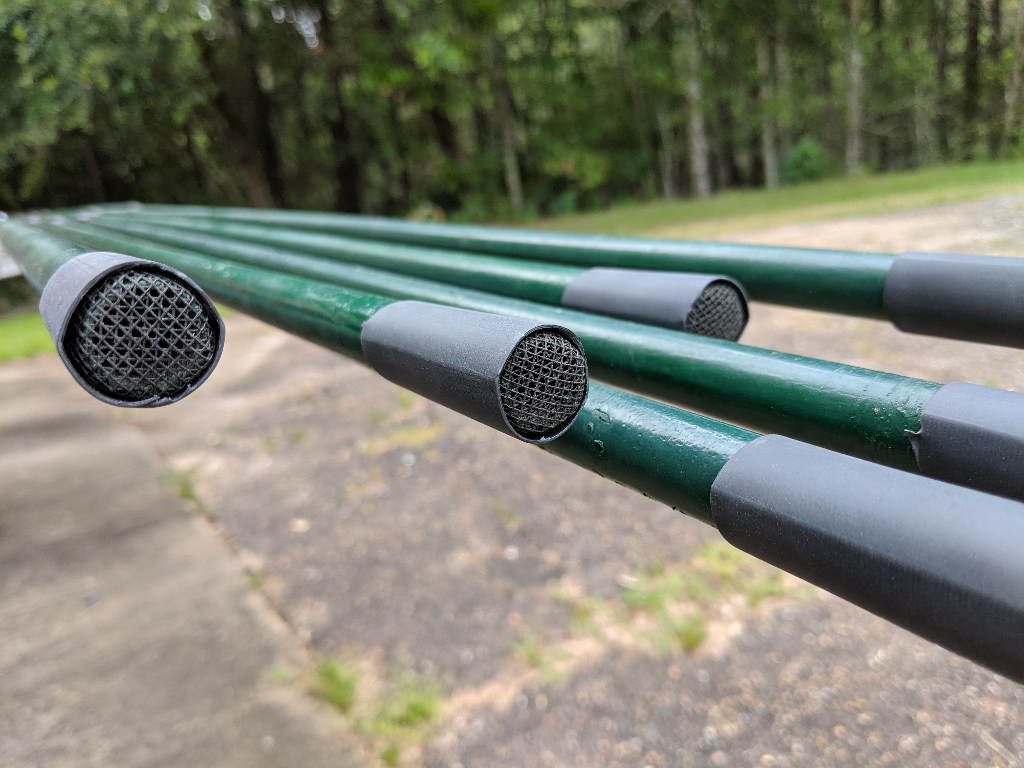

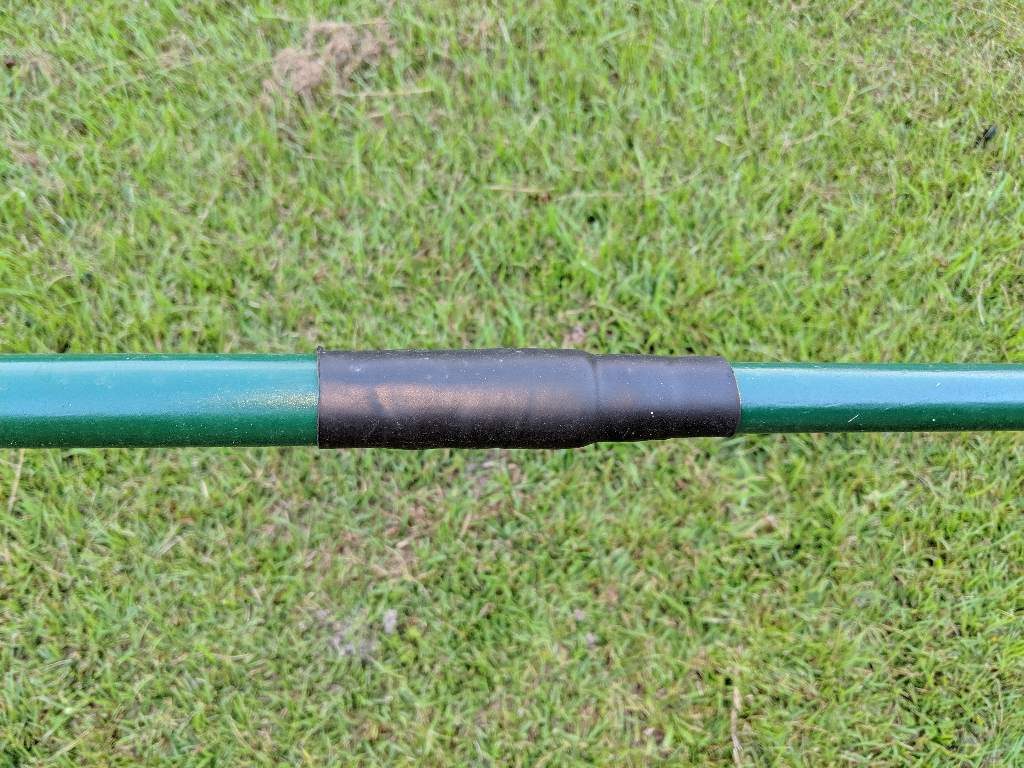
My solution to hopefully prevent this in the future was to take 2 small squares of screen door material, put them at a 45 deg angle to one another and place this over the ends of the elements. A piece of adhesive heat shrink tubing slid over that and then heated so that the everything would stay in place. I feel fairly confident that this will present enough of an obstacle to any critters from crawling inside and trying to build a nest while still allowing air-flow through the tube.